轮播图插件,可以同时支持Vue.js(1.X ~ 2.X),兼顾PC和移动端,随着vue的广泛使用,其中插件swiper也算是使用的比较频繁的插件,现在分享一下使用方法以及开发中会遇到的一些问题。

我们先下载包,然后去main.js里面配置。

1
npm install vue-awesome-swiper --save

我们可以用import的方法

1
2
3
//import
import Vue from 'vue'
import VueAwesomeSwiper from 'vue-awesome-swiper'

也可以用require

1
2
var Vue = require('vue')
var VueAwesomeSwiper = require('vue-awesome-swiper')

两者都可以达到目的,然后再mian.js里面全局注册

1
Vue.use(VueAwesomeSwiper)

在模板里使用

1
2
3
4
5
6
7
8
import { swiper, swiperSlide } from 'vue-awesome-swiper'

export default {
components: {
swiper,
swiperSlide
}
}
1
2
3
4
5
6
7
8
9
10
11
12
13
14
15
16
17
18
19
20
21
22
23
24
25
26
27
28
29
30
31
32
33
34
35
36
37
38
39
40
41
42
43
44
45
46
47
48
49
50
51
52
53
54
55
56
57
58
59
60
61
62
63
64
65
66
67
<template>
<swiper :options="swiperOption" ref="mySwiper">
<!-- slides -->
<swiper-slide v-for="slide in swiperSlides" v-bind:style="{ 'background-image': 'url(' + slide + ')' }" :key="slide.id"></swiper-slide>
<!-- Optional controls -->
<div class="swiper-pagination" slot="pagination"></div>
<div class="swiper-button-prev" slot="button-prev"></div>
<div class="swiper-button-next" slot="button-next"></div>
</swiper>
</template>

<script>
import { swiper, swiperSlide } from 'vue-awesome-swiper'
export default {
name: 'carrousel',
components: {
swiper,
swiperSlide
},
data () {
return {
swiperOption: { //以下配置不懂的,可以去swiper官网看api,链接http://www.swiper.com.cn/api/
notNextTick: true, // notNextTick是一个组件自有属性,如果notNextTick设置为true,组件则不会通过NextTick来实例化swiper,也就意味着你可以在第一时间获取到swiper对象,假如你需要刚加载遍使用获取swiper对象来做什么事,那么这个属性一定要是true
autoplay: true,
loop: true,
direction: 'horizontal',
grabCursor: true,
setWrapperSize: true,
autoHeight: true,
pagination: {
el: '.swiper-pagination'
},
centeredSlides: true,
paginationClickable: true,
navigation: {
nextEl: '.swiper-button-next',
prevEl: '.swiper-button-prev'
},
keyboard: true,
mousewheelControl: true,
observeParents: true, // 如果自行设计了插件,那么插件的一些配置相关参数,也应该出现在这个对象中,如下debugger
debugger: true
},
swiperSlides: ['../../static/img/swiper1.jpg', '../../static/img/swiper2.jpg', '../../static/img/swiper3.jpg', '../../static/img/swiper4.jpg']
}
}
}
</script>

<!-- Add "scoped" attribute to limit CSS to this component only -->
<style>
html, body, #app {
height: 100%;
width: 100%;
}
.swiper-container-autoheight, .swiper-container-autoheight .swiper-slide {
height: 100vh;
}
.swiper-pagination-bullet {
width: 15px;
height: 15px;
}
.swiper-pagination-fraction, .swiper-pagination-custom, .swiper-container-horizontal > .swiper-pagination-bullets {
bottom: 8%;
}
</style>

这样就可以正常使用了,但是以下是一些开发中遇到的一些问题。

很多人在引入swiper的时候会出现小点swiper-pagination出不来或者一些配置属性没有生效。原因是现在最新的swiper版本已经开始区分组件和普通版本了。
在低版本swiper中,我们可以这么写(我相信大部分童鞋百度,论坛到的使用方法大多是这样子的)

1
2
3
4
5
6
7
8
9
10
11
12
13
14
15
16
17
18
19
20
21
22
23
24
25
26
27
28
<script>
// swiper options example:
export default {
name: 'carrousel',
data() {
return {
swiperOption:
notNextTick: true,
// swiper configs 所有的配置同swiper官方api配置
autoplay: 3000,
direction: 'vertical',
grabCursor: true,
setWrapperSize: true,
autoHeight: true,
pagination: '.swiper-pagination',
paginationClickable: true,
prevButton: '.swiper-button-prev',//上一张
nextButton: '.swiper-button-next',//下一张
scrollbar: '.swiper-scrollbar',//滚动条
mousewheelControl: true,
observeParents: true,
debugger: true,
}
}
},

}
</script>

注意!!!!

这其中的autoplay和pagination和prevButton和nextButton等属性,在低版本中是允许这么使用的,并且可以功能正常生效,但是再高版本swiper中这样写不会生效,并且vue不会报错。
接下来我们看官网api,拿分页器pagination举个栗子:

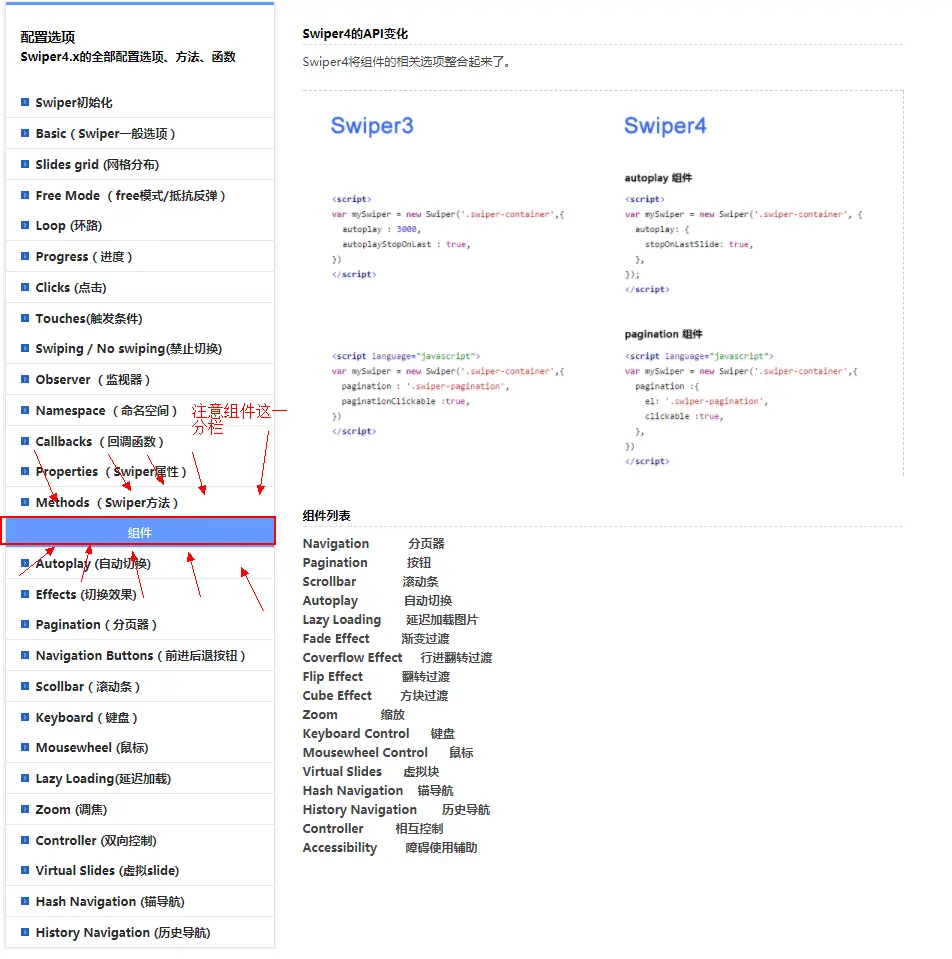
在以前低版本的swiper是没有这样子的区分的!所以现在我们可以看看最新版本的swiper分页器的具体文档:

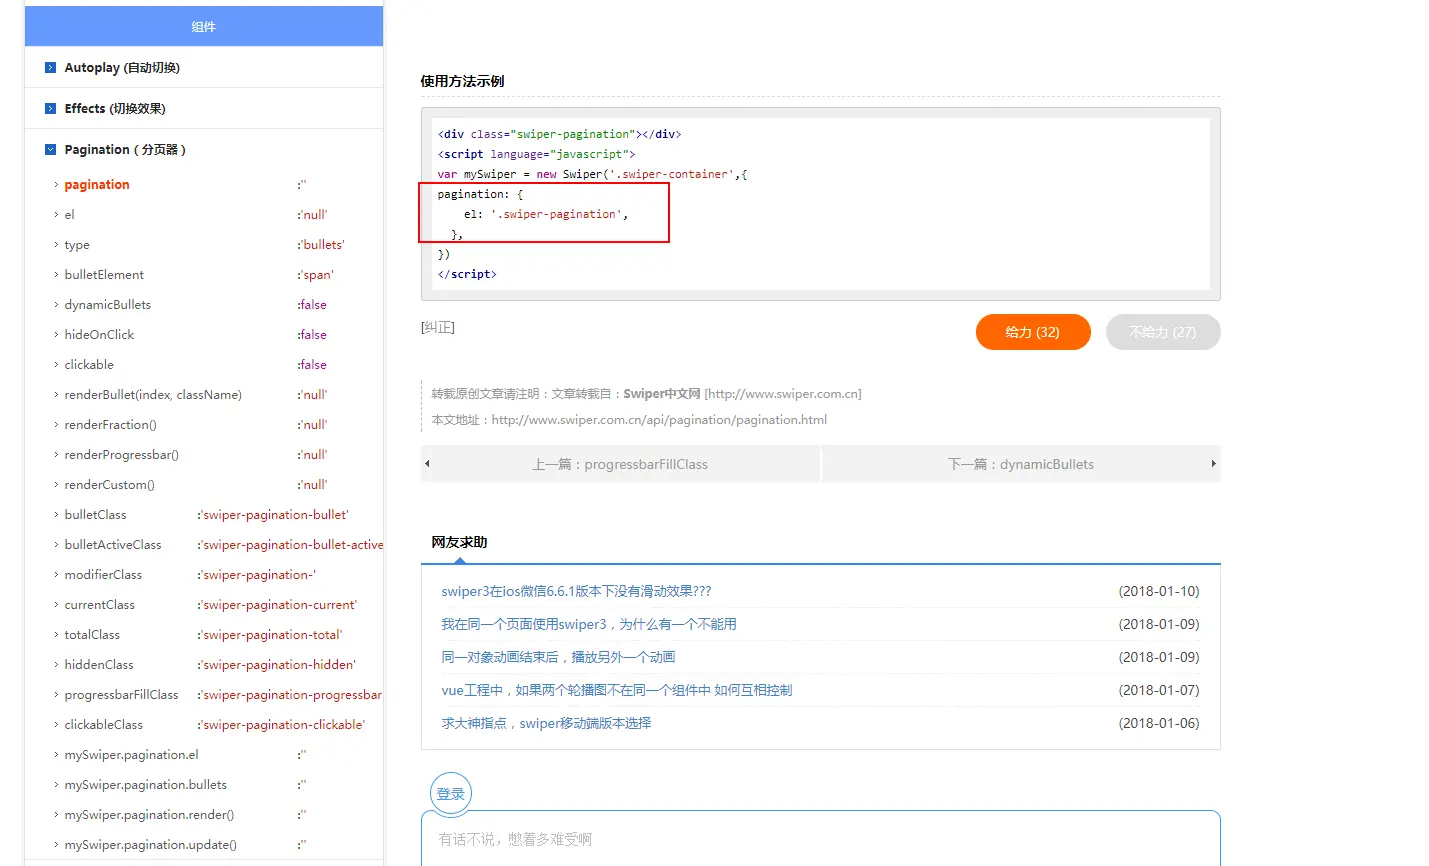
图中标记的部分很明显已经不同于低版本的swiper的使用方法。

还有一些区别官网的api已经写的很清楚了,感兴趣的小伙伴可以自行在官网api中阅读查看噢!